SDK Configurations
This guide explains the configuration methods for Dapi React-Native SDK and how to set environment, send data to your backend server and customize Dapi UI.
Dapi Configurations
You can use DapiConfigurations to configure the SDK as follows.
let configurations = new DapiConfigurations(['AE', 'US'], DapiEnvironment.sandbox);

configurations.postSuccessfulConnectionLoadingText = 'Loading';
configurations.showTransferSuccessfulResult = true;
configurations.showTransferErrorResult = true;

let extraBody = {"key":"Value","key2":"Value"};

configurations.endPointExtraBody = extraBody;

let extraHeaders = {"key":"Value","key2":"Value"};
configurations.endPointExtraHeaderFields = extraHeaders;

let primaryColor = new Map<string, string>();
primaryColor.set('lightMode', '#610903');
primaryColor.set('darkMode', '#cf1002');
configurations.theme = new DapiThemeConfigurations(DapiTheme.dark, Object.fromEntries(primaryColor));
configurations.language = DapiLanguage.ar;
Configuration Parameters
Parameter | Description |
|---|---|
environment | The running environment for Dapi. |
countries | Array of countries that you support, use the |
extraHeaderFields | HashMap of header fields to send to any endpoint. |
extraBody | HashMap of entries to include in any request under the key |
postSuccessfulConnectionLoadingText | The text to show in the loader screen after a successful credentials input on Connect. |
showTransferSuccessfulResult | Boolean that controls the Result Screen visibility after a successful payment attempt using Dapi UI. Set true to show Result Screen, false otherwise. |
showTransferErrorResult | Boolean that controls the Result Screen visibility after a failed payment attempt using Dapi UI. Set true to show Result Screen, false otherwise. |
theme |
|
language | The language of the SDK Supported languages: English Default language: |
Start the SDK with your configurations
let configurations = new DapiConfigurations(['AE', 'US'], DapiEnvironment.sandbox);

configurations.postSuccessfulConnectionLoadingText = 'Loading';
configurations.showTransferSuccessfulResult = true;
configurations.showTransferErrorResult = true;

let extraBody = new Map<string, any>();
extraBody.set('key1', 'value1');
extraBody.set('key2', 'value2');

configurations.endPointExtraBody = extraBody;

let extraHeaders = new Map<string, any>();
extraHeaders.set('key1', 'value1');
extraHeaders.set('key2', 'value2');

configurations.endPointExtraHeaderFields = extraHeaders;

let primaryColor = new Map<string, string>();
primaryColor.set('lightMode', '#610903');
primaryColor.set('darkMode', '#cf1002');
configurations.theme = new DapiThemeConfigurations(DapiTheme.dark, Object.fromEntries(primaryColor));

await Dapi.instance.start(
  '#app_key#',
  '#client_user_id',
  configurations
)
Note
ClientUserIDis used to distinguish between different users on the same device. The value for ClientUserID needs to be set by you. We recommend setting clientUserID to your actual user ID that you use to distinguish between users. You should update the clientUserID once the user logs out and another user logs in.
Modify the SDK configurations
You can modify the configurations after you've started the SDK successfully by using Dapi.instance.setConfigurations() to set your modifications
let configurations = new DapiConfigurations(['AE', 'US'], DapiEnvironment.sandbox);

configurations.postSuccessfulConnectionLoadingText = 'Loading';
configurations.showTransferSuccessfulResult = true;
configurations.showTransferErrorResult = true;

let extraBody = {"key":"Value","key2":"Value"};

configurations.endPointExtraBody = extraBody;

let extraHeaders = {"key":"Value","key2":"Value"};
configurations.endPointExtraHeaderFields = extraHeaders;

Dapi.instance.setConfigurations(configurations);
Modify the clientUserID
You can modify the clientUserID after you've started the SDK successfully by using Dapi.instance. setClientUserID() to set your modifications.
Dapi.instance.setClientUserID("clientUserID");Enable Network Logging
Enable network logging to get full information on the requests happening inside the SDK.
- For Android:
- Open
AndroidManifest.xml. - Add the following code.
- Open
<application
     android:icon="@mipmap/ic_launcher"
     android:label="@string/app_name"
     android:roundIcon="@mipmap/ic_launcher_round"
     .
	 .
	 .>

      <!--enable logger-->
      <meta-data
          	android:name="co.dapi.networkLoggingEnabled"
            android:value="true" />
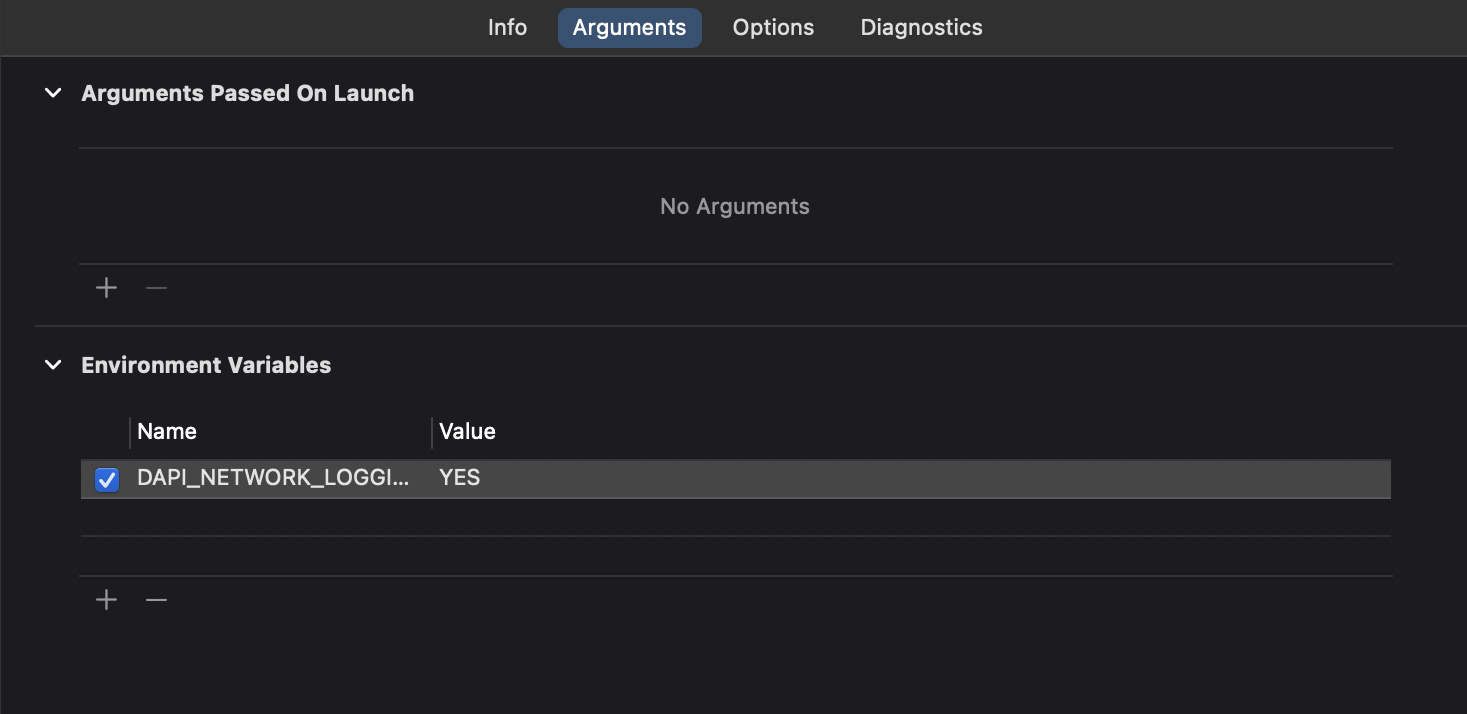
</application>- For iOS:
- Open
Product->Scheme->Edit Scheme->Arguments - Add
DAPI_NETWORK_LOGGIN_ENABLEDenvironment variable with valueYES
- Open

Updated 8 months ago