How to integrate with Flutter SDK
Follow the guide to set-up Flutter SDK integration
Required Flow
Before starting the integration with our Flutter SDK, it is important to understand the overall flow of requests coming from the SDK to Dapi's system. In addition to setting up the Flutter SDK, you will also need to configure a backend server. The purpose of the backend server is to provide an extra layer of security and allow you to confirm the information on your backend if required by your use case.
.jpg")
Flow with the Flutter SDK.
Setting-up App Backend Server (Node.js)
If you are not interested in setting up the server using Node.js, you can refer to the Server Side Libraries and follow any quickstart instructions for a different language.
Install npm libraries in your project
npm i @dapi-co/dapi-node
npm i express
npm i cors
Save the following file as server.js. You might need to install the other dependencies if they don't already exist on your machine.
var express = require('express')
const DapiApp = require('@dapi-co/dapi-node')
var cors = require('cors')

const app = express()
const port = 8060 // default port to listen
app.use(cors())
app.use(express.json())

const dapi = new DapiApp.default({
  appSecret: 'YOUR_APP_SECRET',
})

// define a route handler for the sdk
app.post('/dapi', async (req, res) => {

  try {

    const dapiResponse = await dapi.handleSDKDapiRequests(req.body, req.headers)
    res.send(dapiResponse)

  } catch (error) {

    //Handle Network Errors
    console.dir(error)
  }
})

// start the Express server
app.listen(port, () => {
  console.log(`server started at http://localhost:${port}`)
})
In the directory of server.js use the following command to run the server:
node server.jsOnce the server is running successfully, also make sure to add the App Server URL to the Dapi Dashboard. In this way, the SDK will automatically know where to send its requests to.
If you followed the above NodeJS and Express example the App Server URL value is http://localhost:8060/dapi.

After adding App Server URL on Dapi Dashboard
You are now all set to start your Flutter integration!
Flutter SDK Example
Clone this repository, run the application and see Dapi in action.
Flutter SDK Configuration
Install SDK
Install dapi
flutter pub add dapiStart SDK
- Import Dapi
import 'package:dapi/dapi.dart';- Start the SDK with your configuration
await Dapi.start(
  "APP_KEY",
  "JohnDoe",
  configurations: new DapiConfigurations(
  		environment: DapiEnvironment.PRODUCTION, //Or DapiEnvironment.SANDBOX for testing
  		countries: List.from({"AE"}))
);
In case you get App config not found error double check your applicationId for Android or Bundle Identifier for iOS is the same as the bundleID you set on the dashboard.
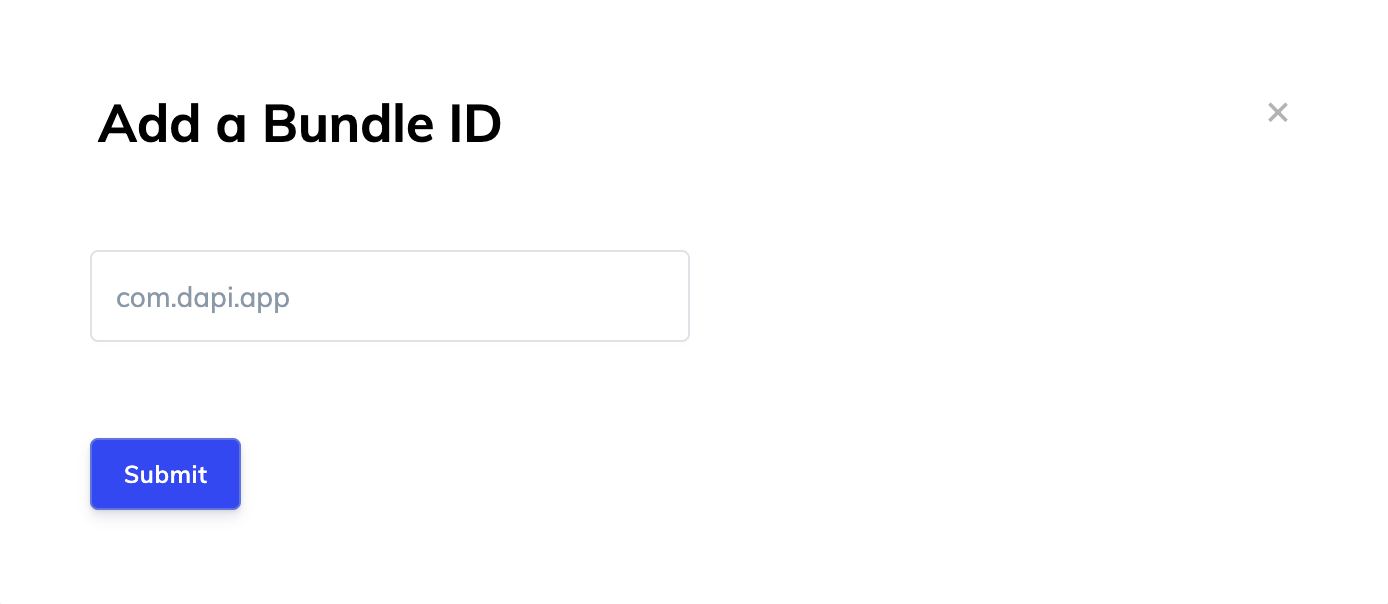
For Android:
- Open your build.gradle file
- Copy the value of applicationId
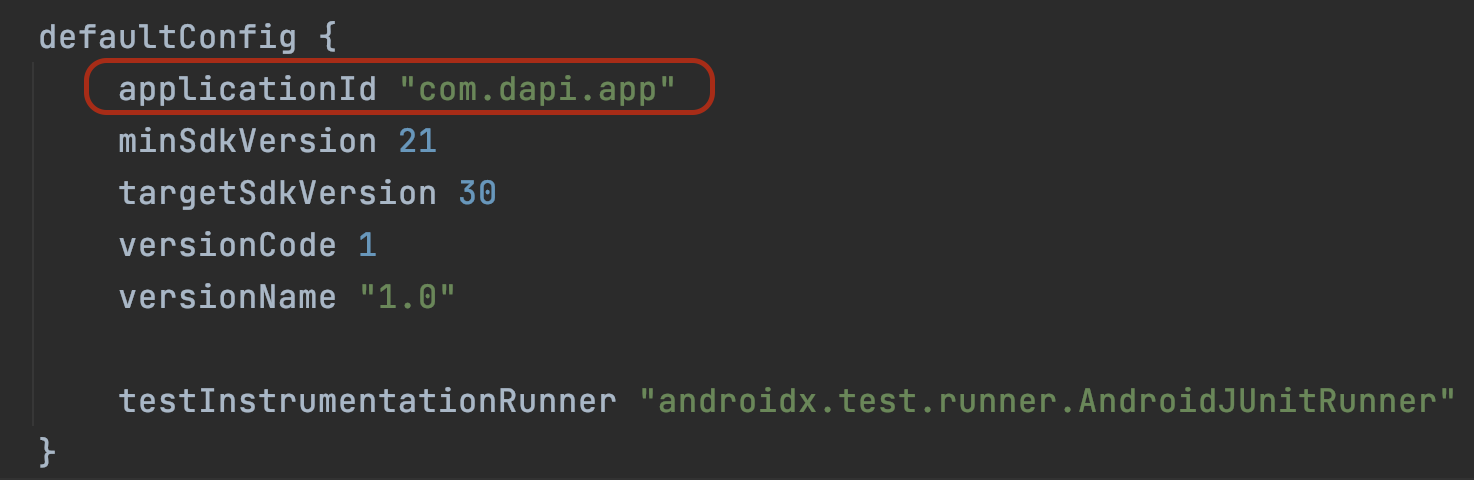
- Open your app in the dashboard
- Go to App Settings -> Bundle IDs
- Click on the + icon, paste the copied value and click Submit
For iOS:
- Open your .xcodeproj file
- Copy the value of Bundle Identifier

- Add it to the dashboard too If it is different from your Android applicationId
Create Bank Connection
Let's now create a connection object. A connection represents a user's connection to a bank. So if they authenticate and login, through Dapi, to 2 banks there will be 2 connections.
Since you don't know yet which bank the user will choose, you will just display the connect page. The user has to then pick the bank and enter their credentials.
Dapi.presentConnect();
Bank selection

Credentials
Add listeners to handle a successful or a failed connection attempt.
Dapi.onConnectionSuccessful.listen((m) => print("CONNECTION_SUCCESSFUl"));

  Dapi.onConnectionFailure.listen((m) => print("CONNECTION_FAILED"));
That's it. You can now try to run your app on the emulator and call the presentConnect function and see Dapi in action!
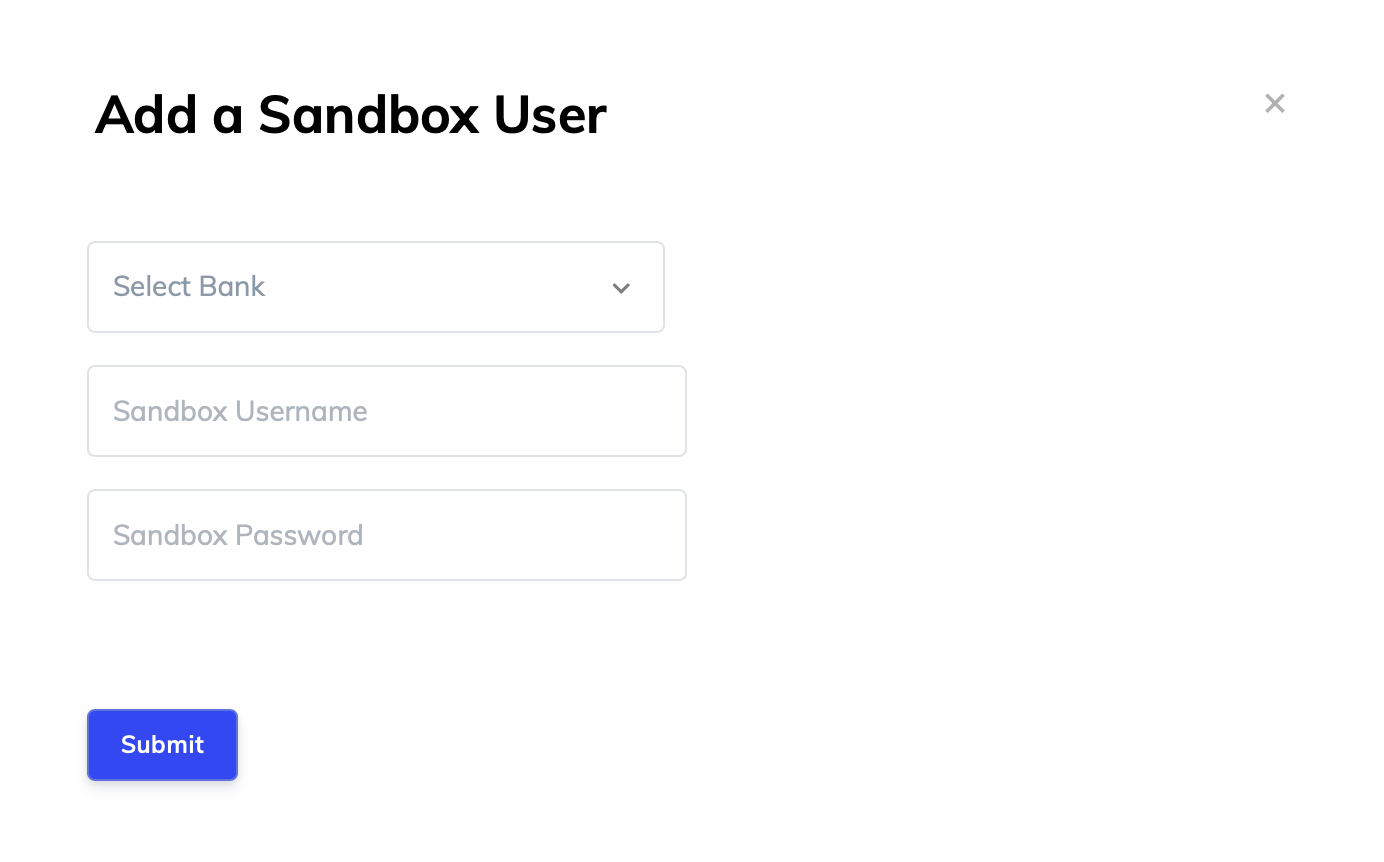
Create Sandbox User
You can create users for sandbox environment to test your integration with Dapi instead of connecting your real accounts
Navigate to Dashboard -> Apps -> Your App -> Sandbox -> Create a Sandbox User
Enter the following details and click Submit.
- Sandbox Bank: select a bank from the dropdown list
- Sandbox Username : username of your choice
- Sandbox Password : password of your choice
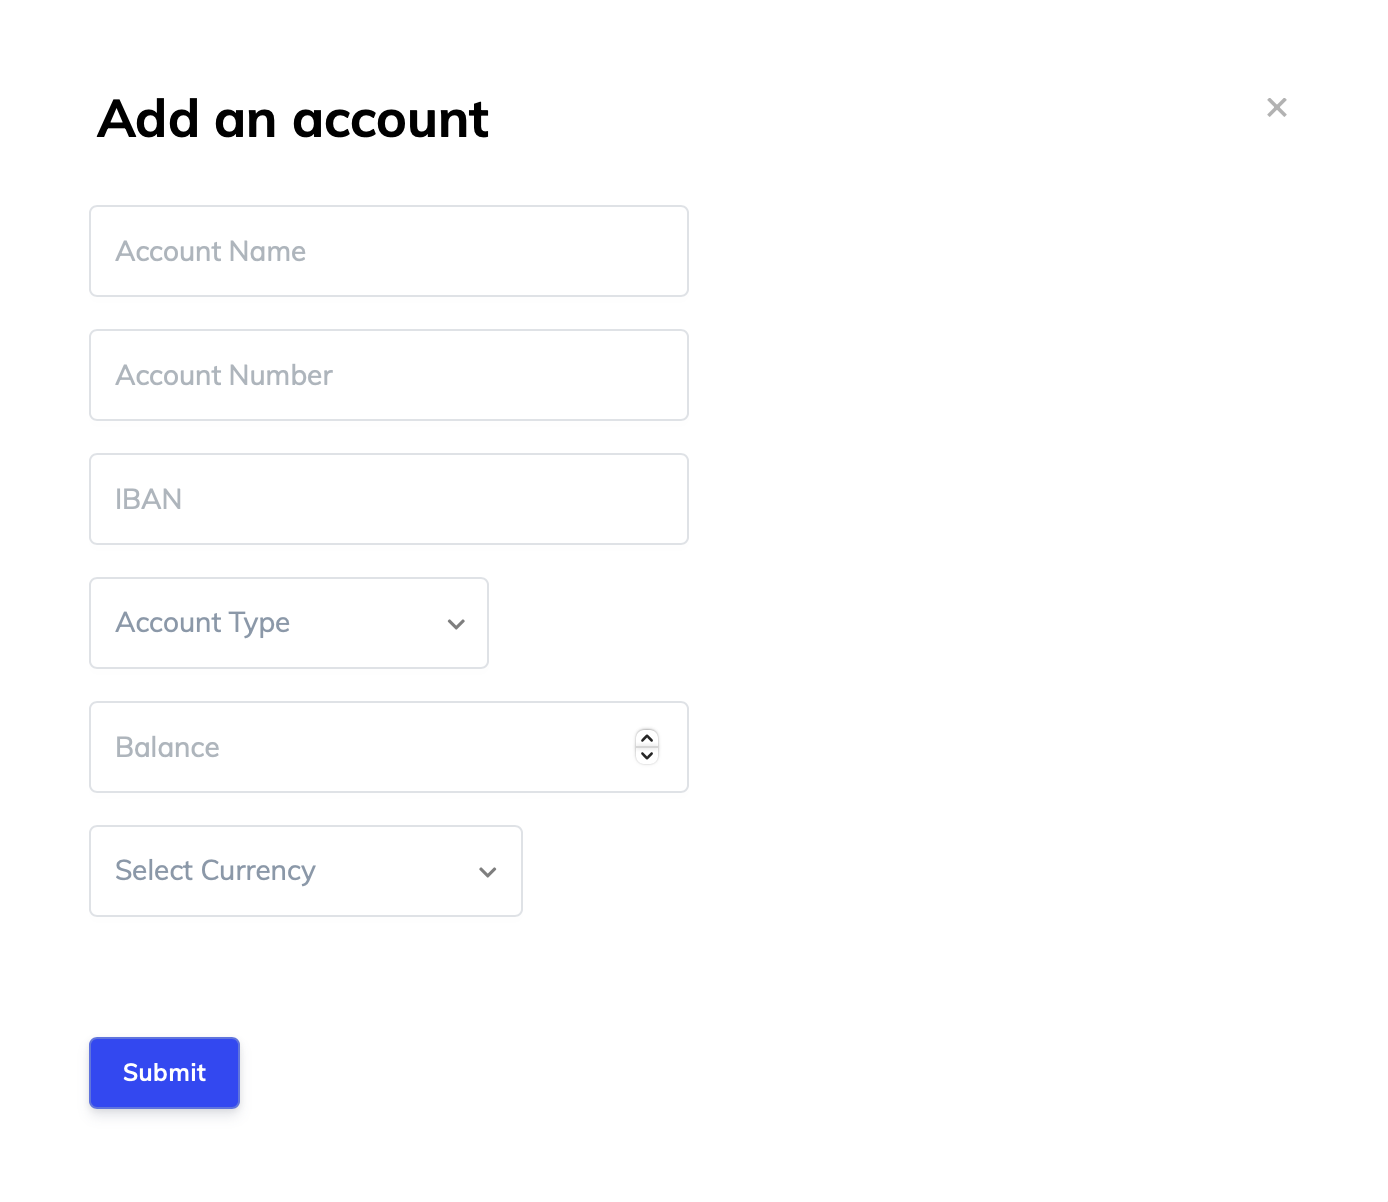
In order to add accounts to a sandbox user, click the NEW button on the Accounts column and provide the following information:
- Acount Name: user's account name (You can see it on the Account Information dialog when you click an account from the Sandbox Users table.)
- Account Number: user's account number (You can see it on the Account Information dialog)
- IBAN: user's IBAN (You can see it on the Account Information dialog)
- Account Type: choose a value from the dropdown
- Balance: set a starting balance for the account
- Currency: choose the currency for the account from the dropdown
Get Cached Connections
When you authenticate and login through Dapi, a DapiConnection object is created and stored in the local cache containing information about your connection to the bank, so that you don't have to authenticate and login again every time you open the app.
Dapi.getConnections() returns the list of connections in cache.
await Dapi.getConnections()Flutter SDK Reference
Payment Endpoints
createTransfer()
A method for creating a transfer. Can be used to make a payment:
- from the user's account to your own account
- from the user's account to another external account
So in a nutshell, you can send money from an account to an account with a specific amount.All 3 variables are optional.
Parameters
NoteBehavior of the SDK depends on the parameters that will be set.
| Parameter | Description |
|---|---|
| toBeneficiary | If you are accepting a transfer into your own company's account, you don't need to set the parameter. You can simply add one in your dashboard under your app. The toBeneficiary will automatically be set to that account. |
| fromAccount | Account from where the amount must be transferred. If you don't set a from account, SDK will simply display a popup screen for your user to pick the account from our UI. If you do provide a from object, this screen won't be displayed. |
| amount | Amount to be transferred. If you don't set an amount SDK will display a screen with a numpad screen for your user to enter the amount in. |
Example - WhentoBeneficiary Is Not Specified
Here we will pick the first account in the connection object. Remember, a bank connection might have several accounts, so the accounts object is a list. You will need to pick which account you're sending from.
await connection.createTransfer(connection.accounts.first, null, 2.0, null);Example - WhentoBeneficiary Is Specified
We first need to create a new Object called Beneficiary. We will then need to set a few details about the bank account we're sending the money to.
DapiLineAddress lineAddress = DapiLineAddress(
      line1: "baniyas road", line2: "dubai", line3: "united arab emirates"
);

DapiBeneficiary beneficiary = DapiBeneficiary(
    address: lineAddress,
    accountNumber: "1623404370879825504324",
    name: "name",
    bankName: "bankName",
    swiftCode: "DAPIBANK",
    iban: "DAPIBANKAEENBD1623404370879825504324",
    country: "UNITED ARAB EMIRATES",
    branchAddress: "branchAddress",
    branchName: "branchName",
    phoneNumber: "xxxxxxxxxxx"
 );

await connection.createTransfer(connection.accounts.first, beneficiary, 2.0, null);
Example - WhenfromAccount Is Not Specified
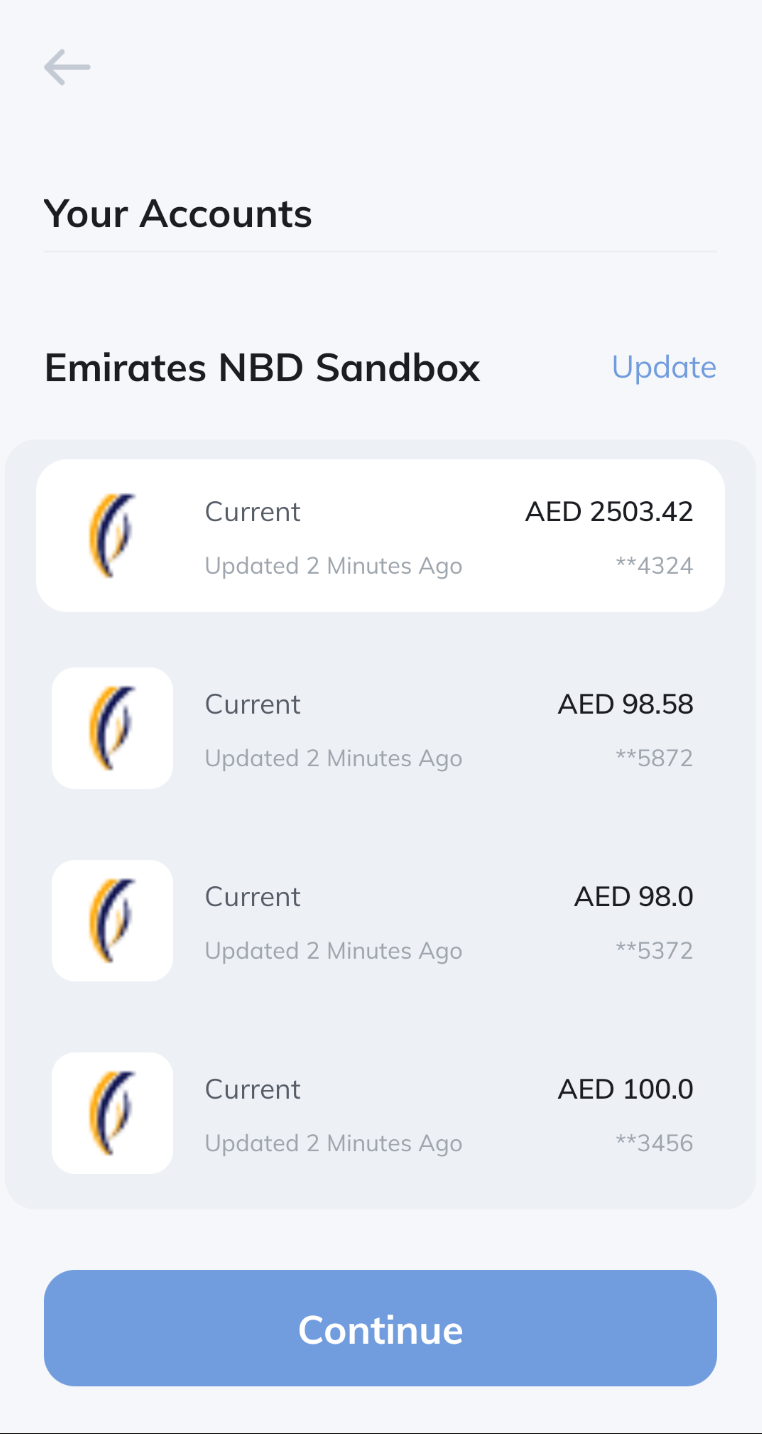
await connection.createTransfer(null, null, 2.0, null);The SDK shows UI for the user to select an account to send money from

Account Selection Screen
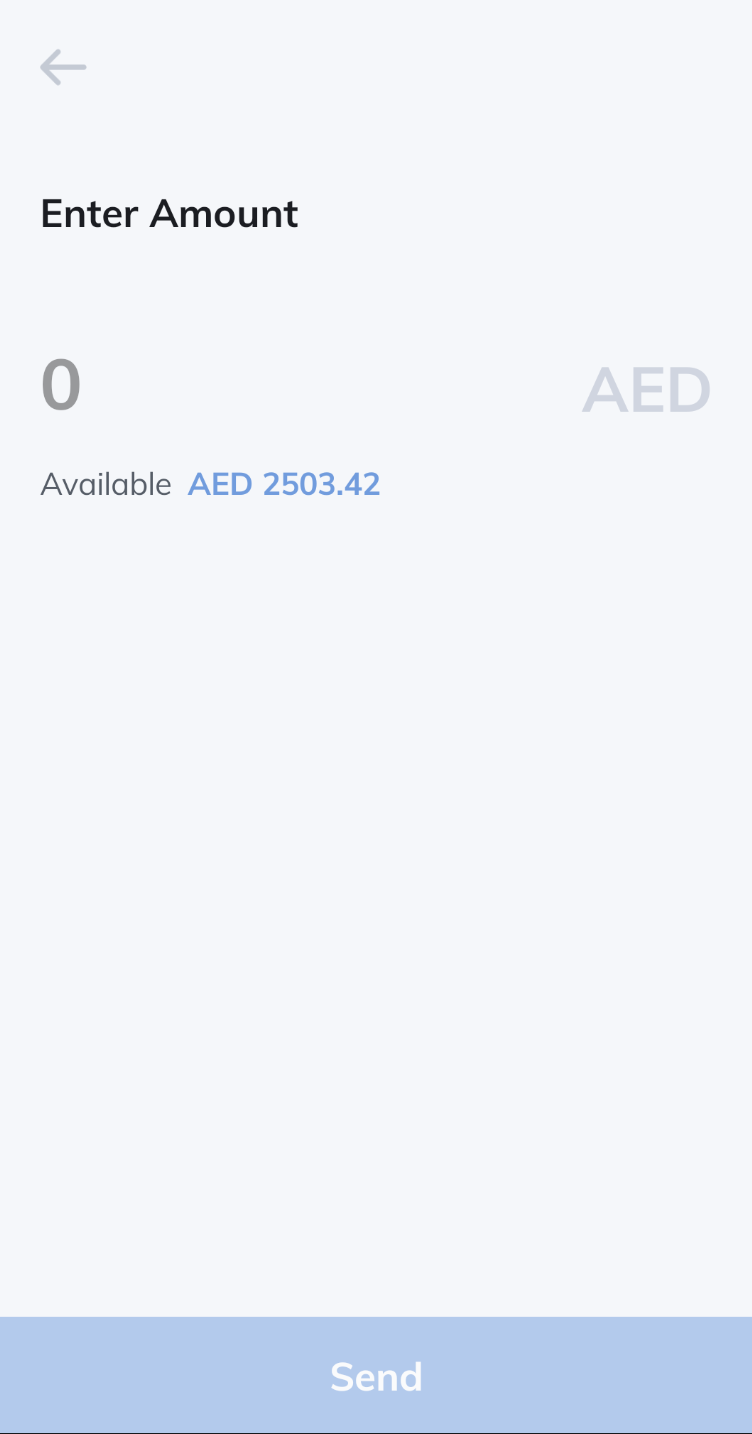
Example - Whenamount Is Not Specified
await connection.createTransfer(connection.accounts.first, null, 0, null);The SDK shows UI for the user to enter the amount to send

Amount Screen
Example - When nothing is specified
await connection.createTransfer(null, null, 0, null);The SDK shows UI for the user to select an account to send money from then navigate to the amount screen to enter the amount to send
createTransferToExistingBeneficiary()
A method for sending money to an existing beneficiary.
Parameters
| Parameter | Description |
|---|---|
| fromAccount | Account from where the amount must be transferred. |
| toBeneficiaryID | The id of the beneficiary to which the money must be transferred. Obtain by connection.getBeneficiaries() |
| amount | Amount to be transferred |
Example
await connection.createTransferToExistingBeneficiary(
    connection.accounts.first,
    beneficiariesResponse.beneficiaries!.first.id!, //get from connection.getBeneficiaries() call
    2.0,
    null
);
Beneficiary Not Activated error on SandboxThis error occurs If you make a transfer on Sandbox to wrong or random beneficiary details, instead you should make the beneficiary details to be of another sandbox user.
To get the beneficiary details of a sandbox user you can do the following:
1- Open your app on the dashboard and navigate to the Sandbox tab. You'll see the Sandbox Users table.
2- Click an Account from the Accounts column.
3- A dialog shows up containing beneficiary details.

Sandbox Account Beneficiary details
createBeneficiary()
A method for adding a new beneficiary
Parameters
| Parameter | Description |
|---|---|
| beneficiary | Information of the beneficiary to add. |
Example
DapiLineAddress lineAddress = DapiLineAddress(
      line1: "baniyas road", line2: "dubai", line3: "united arab emirates"
);

DapiBeneficiary beneficiary = DapiBeneficiary(
    address: lineAddress,
    accountNumber: "1623404370879825504324",
    name: "name",
    bankName: "bankName",
    swiftCode: "DAPIBANK",
    iban: "DAPIBANKAEENBD1623404370879825504324",
    country: "UNITED ARAB EMIRATES",
    branchAddress: "branchAddress",
    branchName: "branchName",
    phoneNumber: "xxxxxxxxxxx"
 );

await connection.createBeneficiary(beneficiary);
getBeneficiaries()
A method for obtaining registered beneficiaries
Parameters
Method does not receive any parameter.
Example
await connection.getBeneficiaries();Metadata Endpoints
getAccountsMetaData()
A method for obtaining bank account metadata
Parameters
Method does not receive any parameter.
Example
await connection.getAccountsMetadata();Data Endpoints
getAccounts()
A method for obtaining and displaying bank accounts of the user
Parameters
Method does not receive any parameter.
Example
await connection.getAccounts();getIdentity()
Get the identity information that has been confirmed by the bank.
These are the identity details that you will get. Not all banks provide all this data. So we will provide as much of it as possible.
Parameters
Method does not receive any parameter.
Example
await connection.getIdentity();getCards()
A method for obtaining and displaying bank cards of the user
Parameters
Method does not receive any parameter.
Example
await connection.getCards();Account - getTransactions()
A method for obtaining and displaying transactions created from users bank accounts. The list will not be filtered. In other words, this will display all the transactions performed by the user from the specified account (not filtered by app).
Parameters
| Parameter | Description |
|---|---|
| account | Account from where the transaction was performed |
| fromDate | Start date of transactions history range |
| toDate | End date of transactions history range |
Example
await connection.getTransactionsForAccount(connection.accounts.first, fromDate, toDate);Card - getTransactions()
A method for obtaining and displaying transactions created from a card. The list will not be filtered. In other words, this will display all the transactions performed by the user from the specified account (not filtered by app).
Parameters
| Parameter | Description |
|---|---|
| card | Card from where the transaction was performed |
| fromDate | Start date of transactions history range |
| toDate | End date of transactions history range |
Example
await connection.getTransactionsForCard(connection.cards.first, fromDate, toDate);Enable Network Logging
Enable network logging to get full information on the requests happening inside the SDK.
- For Android:
- Open
AndroidManifest.xmlin your Android module. - Add the following code.
- Open
<application
     android:icon="@mipmap/ic_launcher"
     android:label="@string/app_name"
     android:roundIcon="@mipmap/ic_launcher_round"
     .
	 .
	 .>

      <!--enable logger-->
      <meta-data
          	android:name="co.dapi.networkLoggingEnabled"
            android:value="true" />
</application>- For iOS:
- Open
Product->Scheme->Edit Scheme->Arguments - Add
DAPI_NETWORK_LOGGIN_ENABLEDenvironment variable with valueYES
- Open

Launch in Production Checklist
This section highlights best practices and recommendations to help you achieve the best user experience with Dapi integration.
ClientUserID configurationClientUserID is used to distinguish between different users on the same device. The value for ClientUserID needs to be set by you. We recommend setting clientUserID to your actual user ID that you use to distinguish between users. You should update the clientUserID once the user logs out and another user logs in.
Why? clientUserID is used to keep track of the bank connections in the cache.
INVALID_CREDENTIALS or INVALID_CONNECTIONWhen receiving this error, the bank account should be connected again. Depending on your flow, you can do one or multiple of those steps:
- Delete the connection
connection.delete()- Prompt the user with Connect screen call
Dapi.presentConnect()to reconnect the bank account. User selects the bank and logs in again.- Prompt the user with the same bank login screen
Dapi.instance.presentConnect(bankID)to reconnect the bank account. User can log in again to the same bank that was connected before and skips the bank choosing stage.Why? This error indicates that the user has updated their online banking credentials. This means that also the linked bank account details should be updated. If your application continues to use outdated details, it may result in blocking the user's banking account.
To reproduce this error on Sandbox to test your implementation you can do the following:
1- Login to your sandbox account
2- Open your app on the dashboard and navigate to the Sandbox tab. You'll see the Sandbox Users table.
3- Delete the account you're currently logged in to.
4- Go back to the Dapi SDK and make any API call and it will return this error

Delete Sandbox Account
Bank IDsIf your logic is relying on bankIDs, then note that sandbox and production bankIDs are different. For example, ADCB:
- Sandbox:
DAPIBANK_AE_ADCB- Production:
ADCBAEAA
Do you have internal timeouts?Do you usually have a default timeout for the requests going out of your application or server? It is possible that resolving a request with the bank can take longer. Dapi has an internal timeout at 2 minutes for any request.
Having a shorter timeout on your end can result in it occasional
504errors.
Additional checklist for Payment API
Special charactersPlease double-check that you are only passing in alpha-numeric values in the beneficiary information. Including special characters in any of the fields will result in errors later on.
BENEFICIARY_COOL_DOWN_PERIODMake sure you have handled the beneficiary cooldown period. Receiving this error means that beneficiary activation will take time from the bank side and the user must wait for the cooldown period to end before attempting the transfer again.
The exact time taken varies based on the user's bank. You can get the time take for the beneficiary to be active for any bank by using getAccountsMetaData API. You can for example use it to schedule a notification for the user to send money again when the beneficiary is activated.
Production Access
Once you have completed the above checklist here are the 2 simple steps to move your application from Sandbox to Production.
1. AppKey Permissions
Contact the Dapi team to give your existing appKey the permission to make calls in our Production environment.
2. Change the environment variable to DapiEnvironment.PRODUCTION
environment variable to DapiEnvironment.PRODUCTIONawait Dapi.start(
"APP_KEY",
"JohnDoe",
configurations: new DapiConfigurations(
environment: DapiEnvironment.PRODUCTION, //used to be DapiEnvironment.SANDBOX
countries: List.from({"AE"}))
);Congratulations, you are all set with your Dapi integration!
Updated about 1 year ago